🧶 50 Days. 100 Granny Squares. 💪 Are YOU up to the task? Let’s hook it up together! 🎉
Here’s how it works:
✨ A new daily tutorial will be posted on my YouTube channel each day! www.youtube.com/@Adorescrochetcloset
✨ Make 2 granny squares a day (your color combos, your style!)
✨ Share your progress with us – I’ll post a 10-day check-in so we can cheer each other on!
✨ Most important rule: HAVE FUN! 🎉
📸 Don’t forget to show off your cool color choices – we want to see your creativity shine!
👉 Who’s in?! Drop a 🧵 or 💖 in the comments if you’re joining!
Follow the Socials below for daily updates!!!!!!!
Youtube, Instagram, and TikTok

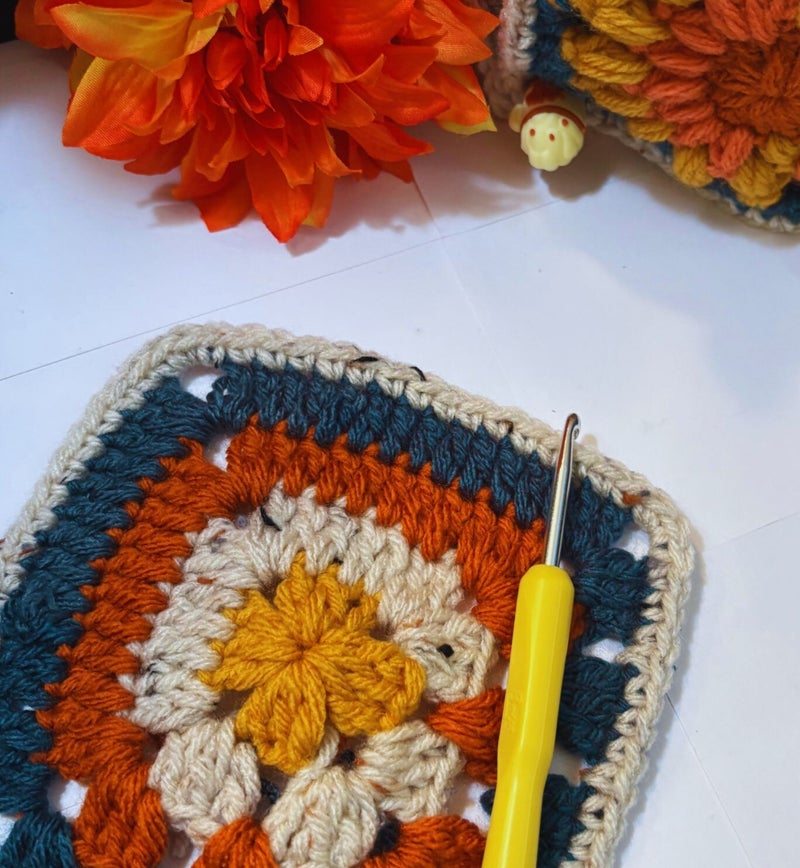
🔥💜 Day 1 Pattern Drop! Granny Square of the Day (9/16/2025) 🧵
✨ Just a little yarny disclaimer ✨
Most of my projects are stitched up with trusty Big Twist acrylic (RIP Joann—you’ll forever live on in my yarn stash 🧶💔). Every now and then, Bernat sneaks in for a cameo, but let’s be real—if it’s acrylic, it’s fair game! One day I might treat myself to those bougie $20 skeins… but today is definitely not that day. 😂

Day 1: Pattern of the day
You can find a tutorial of the granny square on my YouTube channel follow the link at the top of the page!
Stitches used (based on standard crochet symbols):
- chain (ch)
- double crochet (dc)
- slip stitch (sl st)
Instructions
Round 1 (center):
- Ch 4, join with sl st to form a ring.
- Ch 3 (counts as dc), 2 dc into ring, ch 3.
- (3 dc, ch 3) 3 times more.
- Join with sl st to top of starting ch-3.
➡ You should have 4 sets of 3 dc, separated by 4 ch-3 corners.
Round 2: ( If you are doing a color change, I suggest tying off at the end of round 1. Connect your new color by tying it around one of your chain 3 corner spaces and chaining 3 to start the second row.)
- Sl st into next 2 dc and into corner space.
- Ch 3 (counts as dc), 2 dc, ch 3, 3 dc all in corner space.
- Ch 1.
- (3 dc, ch3, 3 dc) in next corner space, ch 1 — repeat around.
- Join with sl st to top of starting ch-3.
Round 3: ( If you are doing a color change, I suggest tying off at the end of round 2. Connect your new color by tying it around one of your chain 3 corner spaces and chaining 3 to start the third row.)
- Sl st to corner space.
- Ch 3, 2 dc, ch 3, 3 dc in corner space.
- Ch 1, 3 dc in next ch-1 space, ch 1.
- (3 dc, ch 3, 3 dc) in corner space, ch 1, 3 dc in next ch-1 space, ch 1 — repeat around.
- Join with sl st.
Round 4: ( If you are doing a color change, I suggest tying off at the end of round 3. Connect your new color by tying it around one of your chain 3 corner spaces and chaining 3 to start the fourth row.)
- Sl st into corner space.
- Ch 3, 2 dc, ch 3, 3 dc in corner space.
- Ch 1, 3 dc in each ch-1 space across, separated by ch 1.
- Work (3 dc, ch 3, 3 dc) in each corner space as you go.
- Join with sl st.
Optional Border (Single Crochet)
- After completing your last round, ch 1.
- Work 1 sc into every dc and every ch-1 space along the sides.
- In each corner ch-3 space, work 3 sc.
- Continue around the square evenly.
- Join with a sl st to the first sc.
- Fasten off and weave in ends.

Day 2: Pattern of the day!
You can find a tutorial of the granny square on my YouTube channel follow the link at the top of the page!
Diamond Granny Square
Special Stitch: Work into back loop only (BLO) where indicated
Joining: Use slip stitch method.
Instructions
Round 1:
Ch 4, join with a sl st to form a ring.
Ch 3 (counts as dc), 3 dc in ring, ch 3, 4 dc in ring; repeat from * to * 3 more times, ch 3, join with sl st to top of beg ch-3. Tie off
Round 2:
Attach yarn in a corner space. Sc into corner space, ch 3, dc, dc, dc, dc( I dc into each dc from the previous round), ch 4, *sc into the ch 3 space*, ch 3 dc, dc, dc, dc( I dc into each dc from the previous round); repeat from * to * around, ch 2, join with sl st to beg ch-3. Tie off
Round 3: Attach yarn in a corner space. Sc into corner space, ch 3, sc into the next ch 3 space, ch 3, dc, dc, dc, dc(I dc into each dc from the previous round), *ch 3, sc into the ch 3 space, ch 3, sc into the next ch 3 space, ch3, dc, dc, dc, dc(I dc into each dc from the previous round)*; repeat from * to * around, ch 3, join with sl st to beg ch-3. Tie off
Round 4:
Attach yarn in a corner space, ch 3, dc in same corner space, (ch 3 counts as dc), 3dc in next ch 3 space, 2dc into the ch 3 space next to it, skip the 1st in the round and put 3dc into the 2nd st, ch 3, put 3dc into the 3rd st, skip the 4th st , *2dc into the ch 3 space, 3dc in next ch 3 space, 2dc into the ch 3 space next to it, skip the 1st in the round and put 3dc into the 2nd st, ch 3, put 3dc into the 3rd st, skip the 4th st*; repeat from * to * around, ch 3, join with sl st to beg ch-3. Tie off
Round 5: BLO
Attach yarn in a corner space, ch 1, *sc, ch 3, sc*; you will repeat this sequence for all 4 corners.
Working in the back loop only! Sc all 4 sides of your granny square.
Don’t forget when you get to the corners *sc, ch 3, sc*; you will repeat this sequence for all 4 corners.
You now have your Diamond Granny Square!
Optional Border (Single Crochet)
- After completing your last round, ch 1.
- Work 1 sc into every dc and every ch-1 space along the sides.
- In each corner ch-3 space, work 3 sc.
- Continue around the square evenly.
- Join with a sl st to the first sc.
- Fasten off and weave in ends.

Day 3: Pop corn granny square
You can find a tutorial of the granny square on my YouTube channel follow the link at the top of the page!
Popcorn (pop): Work 5 dc in the same stitch, remove hook and insert it into the top of the first dc, pull the last loop through. Ch 1 to close (counts as 1 stitch).
Instructions
Round 1:
Ch 4, join with sl st to form a ring.
Ch 3 (counts as dc), 4 dc in ring, make 1 pop, ch 3.
5 dc in ring, make 1 pop, ch 3; repeat from * to * 3 more times.
Join with sl st to top of first pop. Fasten off.
Round 2:
Attach yarn in any corner ch-3 sp.
Ch 3 (counts as dc), 4 dc in same sp, ch 1.
5 dc in next ch-3 sp, ch 1; repeat from * to * around.
Join with sl st to beg ch-3. Fasten off.
Round 3:
Attach yarn in the 3rd dc of any 5-dc cluster.
Ch 3 (counts as dc), 2 dc in same st, ch 1.
3 dc in next ch-1 sp, ch 1, 3 dc in 3rd dc of next 5-dc cluster, ch 1; repeat from * to * around.
Join with sl st to beg ch-3. Fasten off.
Round 4:
Attach yarn in any ch-1 sp.
Ch 3 (counts as dc), 2 dc in same sp, ch 1.
3 dc in next ch-1 sp, ch 1.
In next ch-1 sp: 3 tr, ch 3, 3 tr (corner made).
Ch 1, 3 dc in next ch-1 sp, ch 1, 3 dc in next ch-1 sp, ch 1, (3 tr, ch 3, 3 tr) in next ch-1 sp (corner).
Repeat from * to * around.
Join with sl st to beg ch-3. Fasten off.
✨ Done! You now have a popcorn-centered granny square with a bold textured middle and lacy edges.
Optional Border (Single Crochet)
-
After completing your last round, ch 1.
-
Work 1 sc into every dc and every ch-1 sp along the sides.
-
In each corner ch-3 sp, work 3 sc.
-
Continue evenly around the square.
-
Join with sl st to first sc.
-
Fasten off and weave in ends.

Day 4: Scallop Center granny square
You can find a tutorial of the granny square on my YouTube channel follow the link at the top of the page!
Round 1
Start by chaining 4. Join with a slip stitch to form a ring.
Now chain 3 — this counts as your first double crochet. Add 2 more double crochets into the ring, then chain 3.
In the same ring, we’re going to repeat: 3 double crochets, chain 3 — do this 3 more times.
When you’re finished, slip stitch into the top of your starting chain 3.
You should now see 4 clusters of 3 double crochets, each separated by a chain 3 corner.
Round 2:
Change colors if you like.
Ch 1, *sc in the ch 3 corner, ch 3,sc into the same corner, ch 3*; repeat * to * till the end of the round. When you’re finished, slip stitch into the top of your starting chain 3.
Round 3:
Change colors if you like.
Ch 3 into a corner space, 8dc into the same corner space, sc into the ch 3 space from the previous row, 9dc into the next corner space, sc into the ch 3 space from the previous row, 9dc into the next corner space; repeat *to* till the end of the round. When you’re finished, slip stitch into the top of your starting chain 3.
Round 4:
Change colors if you like.
Working in the into the 5th st of your 9dc cluster Ch 3, chain 3 more to make the top of your V stitch, dc into the same st as the chain 3 to finish your V stitch. *In the next 3 stitches make 3dc, in the 4th and last stitch of the cluster make a triple crochet. Triple crochet into the sc from the 3rd round, triple crochet into the 1st stitch of the next cluster. Dc into the next 3 stitches*, in the 5th st of your 9dc cluster put a dc, chain 3 to make the top of your V stitch, dc into the same st as the chain 3 to finish your V stitch; repeat * to * till the end of the round. When you’re finished, slip stitch into the top of your starting chain 3.
Round 5:
Change colors if you like.
Ch 3(counts as a dc) into a corner space, dc into the same corner space, ch 3, 2dc into the same corner space, dc into the next 10 st, *2dc into the corner space, ch 3, 2dc into the same corner space, dc into the next 10 st*; repeat * to * till the end of the round. When you’re finished, slip stitch into the top of your starting chain 3.
Done! You’ll now have a Scalloped-centered square
Optional Border (Single Crochet)
- After completing your last round, ch 1.
- Work 1 sc into every dc and every ch-1 space along the sides.
- In each corner ch-3 space, work 3 sc.
- Continue around the square evenly.
- Join with a sl st to the first sc.
- Fasten off and weave in ends.

Day 5: Petals & Lace Granny Square
You can find a tutorial of the granny square on my YouTube channel follow the link at the top of the page!
Instructions
Round 1 :
Ch 4, join with sl st to form a ring.
Ch 1, sc into ring, ch 3, *sc in ring, ch 3*; repeat from * to * 2 more times. Join with sl st into the first sc of the round. Tie off
Round 2 :
Change colors.
Ch 3 (counts as dc), 2dc in same sp, ch 3, 3 dc in same sp (corner space).
*Ch 1, (3 dc, ch 3, 3 dc) in next corner sp*; repeat from * to * 2 more times.
Ch 1, join with sl st to beg ch-3. Tie off
Round 3 :
Change colors.
Ch 3 (counts as dc), (dc, ch 3, dc) in same corner. (V stitch)
*Ch 1, skip next 3 st, dc, ch2, dc in ch-1 sp, (dc, ch 3, dc) in the next corner space. (V stitch)*; repeat from * to * around.
Join with sl st to beg ch-3. Tie off
Round 4 :
Change colors.
Ch 3 (counts as dc), (2dc, ch 3, 3dc) in same corner sp.
*sc into the previous ch 1 space from the 3rd round, sc, sc into the ch 2 space, sc, sc into the chain 1 space,3dc, ch 3, 3dc) in the next corner sp*; repeat from * to * around.
Join with sl st to beg ch-3. Tie off
Round 5 :
Change colors.
Ch 3 (counts as dc), (2dc, ch 3, 3 dc) in same corner sp.
*Ch 1 skip the next cluster of dc, working into the sc from the previous round put 3dc into that same sc, ch 1 (skipping the next three stitches), working into the sc from the previous round put 3dc into that same sc , ch 1, 3dc, ch 3, 3 dc) into the next corner sp*; repeat from * to * around. Join with sl st to beg ch-3. Tie off
Done! You now have a Petals & Lace square with a pretty openwork floral look in the center.
Optional Border (Single Crochet)
- After completing your last round, ch 1.
- Work 1 sc into every dc and every ch-1 space along the sides.
- In each corner ch-3 space, work 3 sc.
- Continue around the square evenly.
- Join with a sl st to the first sc.
- Fasten off and weave in ends.

Day 6: The Starburst granny square
You can find a tutorial of the granny square on my YouTube channel follow the link at the top of the page!
Stitches used (based on standard crochet symbols):
- chain (ch)
- double crochet (dc)
- slip stitch (sl st)
- puff stitch (puff)
- half double crochet (hdc)
- Small puff (yarn over twice)
- Puff (yarn over 3times)
Instructions
Round 1 (center):
-
- Ch 4, join with sl st to form a ring or make a magic circle.
- Ch 3 (counts as dc), 15 dc into ring.
- Join with sl st to top of starting ch-3.
➡ You should have 16 dc.
Round 2: ( If you are doing a color change, I suggest tying off at the end of round 1. Connect your new color by tying it around one of your stitches and chaining 3 to start the second row.)
-
- Ch 3 (counts as dc), yarn over pull through each loop on your hook,(small puff)
- Ch 1.
- yarn over twice pull through each loop on your hook, ch 1 — repeat around.
- Join with sl st to top of your starting puff stitch.
- ➡ You should have 16 puff st.
Round 3: ( If you are doing a color change, I suggest tying off at the end of round 2. Connect your new color by tying it around one of your chain 3 corner spaces and chaining 3 to start the third row.)
-
- Sl st into the next chain 1 space, ch 3
- Ch 3 (counts as dc), yarn over twice pull through each loop on your hook,(puff)
- Ch 3.
- yarn over 3times pull through each loop on your hook, ch 1 — repeat around.
- Join with sl st to top of your starting puff stitch.
➡ You should have 16 puff st.
Round 4: ( If you are doing a color change, I suggest tying off at the end of round 3. Connect your new color by tying it around one of your chain 3 corner spaces and chaining 3 to start the fourth row.)
-
- Sl st into next ch 3 space.
- Ch 3, 2 dc, ch 3, 3 dc in corner space.
- *3 hdc into the next ch 3 space, 3 sc into the next ch 3 space, 3 hdc into the next ch 3 space, 3dc, ch 3, 3 dc in the next ch 3 space making it into a corner space*. — repeat around.
- Join with sl st into the top of the ch 3
Done! You now have a Starburst square!
Optional Border (Single Crochet)
-
- After completing your last round, ch 1.
- Work 1 sc into every dc and every ch-1 space along the sides.
- In each corner ch-3 space, work 3 sc.
- Continue around the square evenly.
- Join with a sl st to the first sc.
- Fasten off and weave in ends.

Day 7: The Stripes granny square
You can find a tutorial of the granny square on my YouTube channel follow the link at the top of the page!
Stitches used (based on standard crochet symbols):
- chain (ch)
- double crochet (dc)
- slip stitch (sl st)
- half double crochet (hdc)
Instructions
Row 1:
-
- Ch 14, ch 3, 3dc in the 2nd chain from your hook. Ch1, skipping 3chains, put 3dc in the 4th chain, ch 1, skipping 3chains, put 3dc in the 4th chain, ch 1, skipping 3chains, put 3dc in the 4th chain, dc into the 14thchain. Turn your work.
Row 2: : ( If you are doing a color change, I suggest tying off at the end of the row. Connect your new color by connecting it to your chain 1 with a sl st and chaining 3 to start the next row.)
-
- Ch 3, ch 1, in the chain 1 space put 3 dc, ch1, and in the next chain 1 space put 3 dc, chain 1, and in the next ch 1 space put 3 dc, ch 1, and put a dc into the last stitch. Turn your work.
Row 3: : ( If you are doing a color change, I suggest tying off at the end of the row. Connect your new color by connecting it to your chain 1 with a sl st and chaining 3 to start the next row.)
-
- Ch 3, 3dc in the first space from the previous row. Ch1, and in the next chain 1 space from the previous row put 3 dc, chain 1, and in the next ch 1 space put 3 dc, ch 1, and in the next ch 1 space put 3 dc and put a dc into the last stitch. Turn your work.
Round 4: ( If you are doing a color change, I suggest tying off at the end of the row. Connect your new color by connecting it to your chain 1 with a sl st and chaining 3 to start the next row.)
-
- Ch 3, ch 1, in the chain 1 space put 3 dc, ch1, and in the next chain 1 space put 3 dc, chain 1, and in the next ch 1 space put 3 dc, ch 1, and put a dc into the last stitch. Turn your work.
Round 5: ( If you are doing a color change, I suggest tying off at the end of the row. Connect your new color by connecting it to your chain 1 with a sl st and chaining 3 to start the next row.)
-
- Ch 3, 3dc in the first space from the previous row. Ch1, and in the next chain 1 space from the previous row put 3 dc, chain 1, and in the next ch 1 space put 3 dc, ch 1, and in the next ch 1 space put 3 dc and put a dc into the last stitch. Turn your work.
Round 6: ( If you are doing a color change, I suggest tying off at the end of the row. Connect your new color by connecting it to your chain 1 with a sl st and chaining 3 to start the next row.)
-
- Ch 3, ch 1, in the chain 1 space put 3 dc, ch1, and in the next chain 1 space put 3 dc, chain 1, and in the next ch 1 space put 3 dc, ch 1, and put a dc into the last stitch. Turn your work.
Round 7: ( If you are doing a color change, I suggest tying off at the end of the row. Connect your new color by connecting it to your chain 1 with a sl st and chaining 3 to start the next row.)
-
- Ch 3, 3dc in the first space from the previous row. Ch1, and in the next chain 1 space from the previous row put 3 dc, chain 1, and in the next ch 1 space put 3 dc, ch 1, and in the next ch 1 space put 3 dc and put a dc into the last stitch. Tie off
Round 8: ( If you are doing a color change, I suggest tying off at the end of the row. Connect your new color by connecting it to your chain 1 with a sl st and chaining 3 to start the next row.)
Connect your yarn around your first ch 3 space of the 7th row. Secure with a slip stitch. Ch 2, hdc in the same ch 3 space, ch 3, 2hdc in the same ch 3 space, skip 2 stitches and put *11 hdc in each st across, skip the next 2 stitches, put 2hdc in the last dc in the row, ch 3, 2more hdc in the same stitch to form a corner*. Repeat * to * around all 4 sides.
Done! You now have a Stripes granny square!
Optional Border (Single Crochet)
-
- After completing your last round, ch 1.
- Work 1 sc into every dc and every ch-1 space along the sides.
- In each corner ch-3 space, work 3 sc.
- Continue around the square evenly.
- Join with a sl st to the first sc.
- Fasten off and weave in ends.
Day 8: The Muddle granny square
You can find a tutorial of the granny square on my YouTube channel follow the link at the top of the page!
Stitches Used (US terms):
-
ch = chain
-
dc = double crochet
-
sl st = slip stitch
Instructions
Round 1:
-
Ch 4, join with sl st to form a ring.
-
Ch 3 (counts as dc), 2 dc in ring, ch 2.
-
(3 dc in ring, ch 2) repeat 3 times.
-
Join with sl st to top of beginning ch-3.
👉 You should have 4 dc clusters and 4 ch-2 corner spaces.
Round 2:
(Color change optional: finish off and join new yarn in a ch-2 corner space.)
-
Ch 3 (counts as dc), 2 dc in same corner sp, ch 3, 3 dc in same sp.
-
Ch 1, skip 3 sts, (3 dc, ch 3, 2 dc) in next corner sp.
-
Dc in each of the next 3 sts.
-
(2 dc, ch 3, 2 dc) in next corner sp, dc in each of the next 3 sts.
-
Repeat around.
-
Finish last side with dc, ch 1. Join with sl st.
Round 3:
(Color change optional.)
-
In corner space: Ch 3, 2 dc, ch 3, 3 dc.
-
Ch 1, skip 3 sts, 3 dc in ch-1 sp, ch 1.
-
In next corner sp: 3 dc, ch 3, 2 dc. Dc in next 7 sts.
-
In corner sp: 2 dc, ch 3, 2 dc. Dc in next 7 sts.
-
In next corner sp: 2 dc, ch 3, 2 dc.
-
Ch 1, skip 3 sts, 3 dc in ch-1 sp, ch 1.
-
Join with sl st.
Round 4:
(Color change optional.)
-
In corner space: Ch 3, 2 dc, ch 3, 3 dc.
-
(Ch 1, skip 3 sts, 3 dc in next ch-1 sp) twice.
-
Ch 1, in corner sp: 3 dc, ch 3, 2 dc. Dc in next 11 sts.
-
In next corner sp: 2 dc, ch 3, 2 dc. Dc in next 11 sts.
-
In corner sp: 2 dc, ch 3, 2 dc.
-
(Ch 1, skip 3 sts, 3 dc in next ch-1 sp) twice.
-
Ch 1, join with sl st.
Optional Border (Single Crochet)
-
After last round, ch 1.
-
Work 1 sc in each dc and ch-1 sp along sides.
-
In each corner ch-3 sp, work 3 sc.
-
Continue evenly around.
-
Join with sl st, fasten off, and weave in ends.

Day 9: The Popcorn Daisy Granny Square
You can find a tutorial of the granny square on my YouTube channel follow the link at the top of the page!
Stitches Used (US terms):
-
ch = chain
-
dc = double crochet
- trc= triple crochet
Special Stitch – Popcorn (pop):
Work 5 dc in the same stitch, remove hook from loop, insert hook into the first dc of the 5, then into the dropped loop, and pull through. (Counts as 1 stitch.) -
sl st = slip stitch
Instructions
Round 1:
Ch 4, join with a sl st to form a ring, or make a magic ring.
Ch 3 (counts as dc), make 7dc into the ring (8 dc).
Join with sl st to top of beginning ch-3. (8 dc, 8 ch-1 sps)
Tie off
Round 2:
Change colors.
Ch 3 (counts as dc), 4 dc in same sp, make 1 pop, ch 2, pop in next stitch — repeat from * to * around.
Join with sl st to top of first pop. (8 pops, 8 ch-2 sps)
Tie off
Round 3:
Change colors.
Sl st into next ch-2 sp or tie off and change colors by tying your new color around a ch2 space. Ch 3 (counts as dc), 2 dc in same sp, ch 1, 3 trc in next ch-2 sp, ch 2, 3 trc in same ch-2 sp to form a corner, ch 1, *3dc in the next ch2 space ch 1, 3 trc in next ch-2 sp, ch 2, 3 trc in same ch-2 sp to form a corner* — repeat from * to * around.
Join with sl st to top of beginning ch-3. (4 sets of two 3trc clusters, 4 dc clusters)
Tie off
Round 4:
Change colors.
Ch 3 (counts as dc), 2 dc in same sp, ch 3, 3 dc in the same space, ch 1, 3dc in the next ch1 space, 3dc in the next ch1 space, *3 dc, ch 2, 3 dc in next ch-1 sp for corner, ch 1, 3 dc in next ch-1 sp, ch , 3 dc in next ch-1 sp* — repeat from * to * around.
Join with sl st to top of beginning ch-3. (4 corners, each with 3dc, ch2, 3dc clusters; two 3dc cluster groups along sides)
Tie off
Optional Border (Single Crochet)
-
After last round, ch 1.
-
Work 1 sc in each dc and ch-1 sp along sides.
-
In each corner ch-3 sp, work 3 sc.
-
Continue evenly around.
-
Join with sl st, fasten off, and weave in ends.

Day 10: Solid Granny Square
You can find a tutorial of the granny square on my YouTube channel follow the link at the top of the page!
Stitches Used (US terms):
-
ch = chain
-
dc = double crochet
-
sl st = slip stitch
-
Note:
To make the square larger, simply repeat Round 4 until your desired size is reached.Joining:
Join rounds with a slip stitch to the top of the beginning chain-3.
Instructions
-
Round 1:
Ch 4, join with a sl st to form a ring.
Ch 3 (counts as dc), 2 dc into ring,
*(ch 2, 3 dc into ring)* — repeat from * to * 2 more times.
Ch 3, join with sl st to top of beginning ch-3.
(You will have 4 groups of 3 dc and 4 ch-3 corner spaces.)Round 2:
Ch 3 (counts as dc), dc, dc, 2dc in the ch 3 corner sp, ch 3, 2dc in the same corner space.
*dc, dc, dc, 2dc in the ch3 corner spac, ch3 2 dc in the same corner space* — repeat from * to * 2 more times.
Ch 1, join with sl st to top of beginning ch-3.Round 3:
Ch 3 (counts as dc), dc, dc, dc, dc, 2dc in the ch 3 corner sp, ch 3, 2dc in the same corner space.
*dc, dc, dc, dc, dc, dc, dc, 2dc in the ch3 corner space, ch3 2 dc in the same corner space* — repeat from * to * 2 more times.
Ch 1, join with sl st to top of beginning ch-3.Round 4:
Ch 3 (counts as dc), dc, dc, dc, dc, dc, dc, 2dc in the ch 3 corner sp, ch 3, 2dc in the same corner space.
*dc, dc, dc, dc, dc, dc, dc, dc, dc, dc, dc, 2dc in the ch3 corner space, ch3 2 dc in the same corner space* — repeat from * to * 2 more times.
Ch 1, join with sl st to top of beginning ch-3.Optional Border (Single Crochet)
- After completing your last round, ch 1.
- Work 1 sc into every dc and every ch-1 space along the sides.
- In each corner ch-3 space, work 3 sc.
- Continue around the square evenly.
- Join with a sl st to the first sc.
- Fasten off and weave in ends.

Day 11: V-Stitch Granny Square
You can find a tutorial of the granny square on my YouTube channel follow the link at the top of the page!
Stitches Used (US terms):
-
ch = chain
-
dc = double crochet
-
sl st = slip stitchSpecial Stitch – V-stitch (V st):
(dc, ch 1, dc) in the same stitch or space. -
Note:
To make the square larger, simply repeat Round 4 until your desired size is reached.Joining:
Join rounds with a slip stitch to the top of the beginning chain-3.
Instructions
Round 1:
Ch 4, join with a sl st to form a ring.
Ch 3 (counts as dc), 2dc in ring, *ch 3, 3 dc in ring* — repeat from * to * 2 more times.
Ch 3, join with sl st to top of beginning ch-3.
(12 dc, 4 ch-3 corner sps)
Round 2:
Starting in a corner space (ch-3 sp).
Ch 3 (counts as dc), ch 2, dc in same corner sp, ch 3, dc, ch 2, dc
*Ch 1 skip the next 3 stitches, dc into the next corner space, ch 2, dc in same corner sp, ch 3, dc, ch 2, dc all in the same corner space*— repeat from * to * around.
Join with sl st to top of beginning ch-3.
Round 3:
Starting in a corner space (ch-3 sp).
Ch 3 (counts as dc), 2dc, ch 3, 3 dc in same sp (corner), ch 1, 3dc in the next ch 1 space, ch 1, *in next corner sp put 3dc, ch 3, 3 dc in next corner sp , ch 1, 3dc in the next ch 1 space, ch 1,* — repeat from * to * around.
Join with sl st to top of beginning ch-3.
Round 4:
Starting in a corner space (ch-3 sp).
Ch 3(counts as dc), ch 2, dc, ch 3, dc in same sp, ch 2, dc, ch 1,
(V-st), dc, ch 1 dc in each ch-1 sp across, ch 1, V-st in the next ch 1 space, ch 1, *in the next corner space dc, ch 2, dc, ch 3, dc in same sp, ch 2, dc, ch 1, (V-st), dc, ch 1 dc in each ch-1 sp across, ch 1, V-st in the next ch 1 space, ch 1*
— repeat from * to * around.
Join with sl st to top of beginning ch-3.
To Continue Increasing:
Repeat Round 4, working a V-st (dc, ch 1, dc) in each ch-1 space along the sides and (2 dc, ch 2, 2 dc) in each corner space.
-
Optional Border (Single Crochet)
- After completing your last round, ch 1.
- Work 1 sc into every dc and every ch-1 space along the sides.
- In each corner ch-3 space, work 3 sc.
- Continue around the square evenly.
- Join with a sl st to the first sc.
- Fasten off and weave in ends.
Create Your Own Website With Webador